
Blog Hosting
Let us host your blog on a custom subdomain with zero technical setup required.
BabyLoveGrowth can host your blog for you on your subdomain (blog.yoursite.com). We handle all the technical details — article publishing, styling, server-side rendering, caching, sitemap, and more. Blog hosting is 100% free to use.
Important: Hosting on a subdomain has the same SEO value as hosting on your main domain. You'll receive all backlinks and SEO benefits just as you would with any other hosting solution. Plus, your blog stays online even if you cancel your subscription.
Note: On Blog Hosting, BabyLoveGrowth controls the base styling and mobile responsiveness. You can customize your brand logo and colors from hosting settings.
Learn more →
Integration Video
Why Choose BabyLoveGrowth Hosting?
No Technical Setup
Just add one DNS record and we handle everything else—no plugins, no theme configuration, no hosting headaches.
Full SEO Benefits
Subdomains provide the same SEO value as your main domain. You get all backlinks, domain authority, and search rankings just like any other hosting solution.
Automatic SSL & CDN
Your blog is served over HTTPS with automatic SSL certificates and global content delivery for fast loading times.
Auto-Publishing
Articles are automatically published to your hosted blog—no manual work required.
Branded Experience
Customize your blog with your brand logo and colors to match your website's look and feel.
Always Online
Your blog stays online even if you cancel your subscription. Your content is preserved permanently.
Setup Instructions
Open Settings → Integrations and select the Blog Hosting banner (under the Publishing & CMS section) to launch the setup wizard. It takes less than a minute and has 3 short steps.
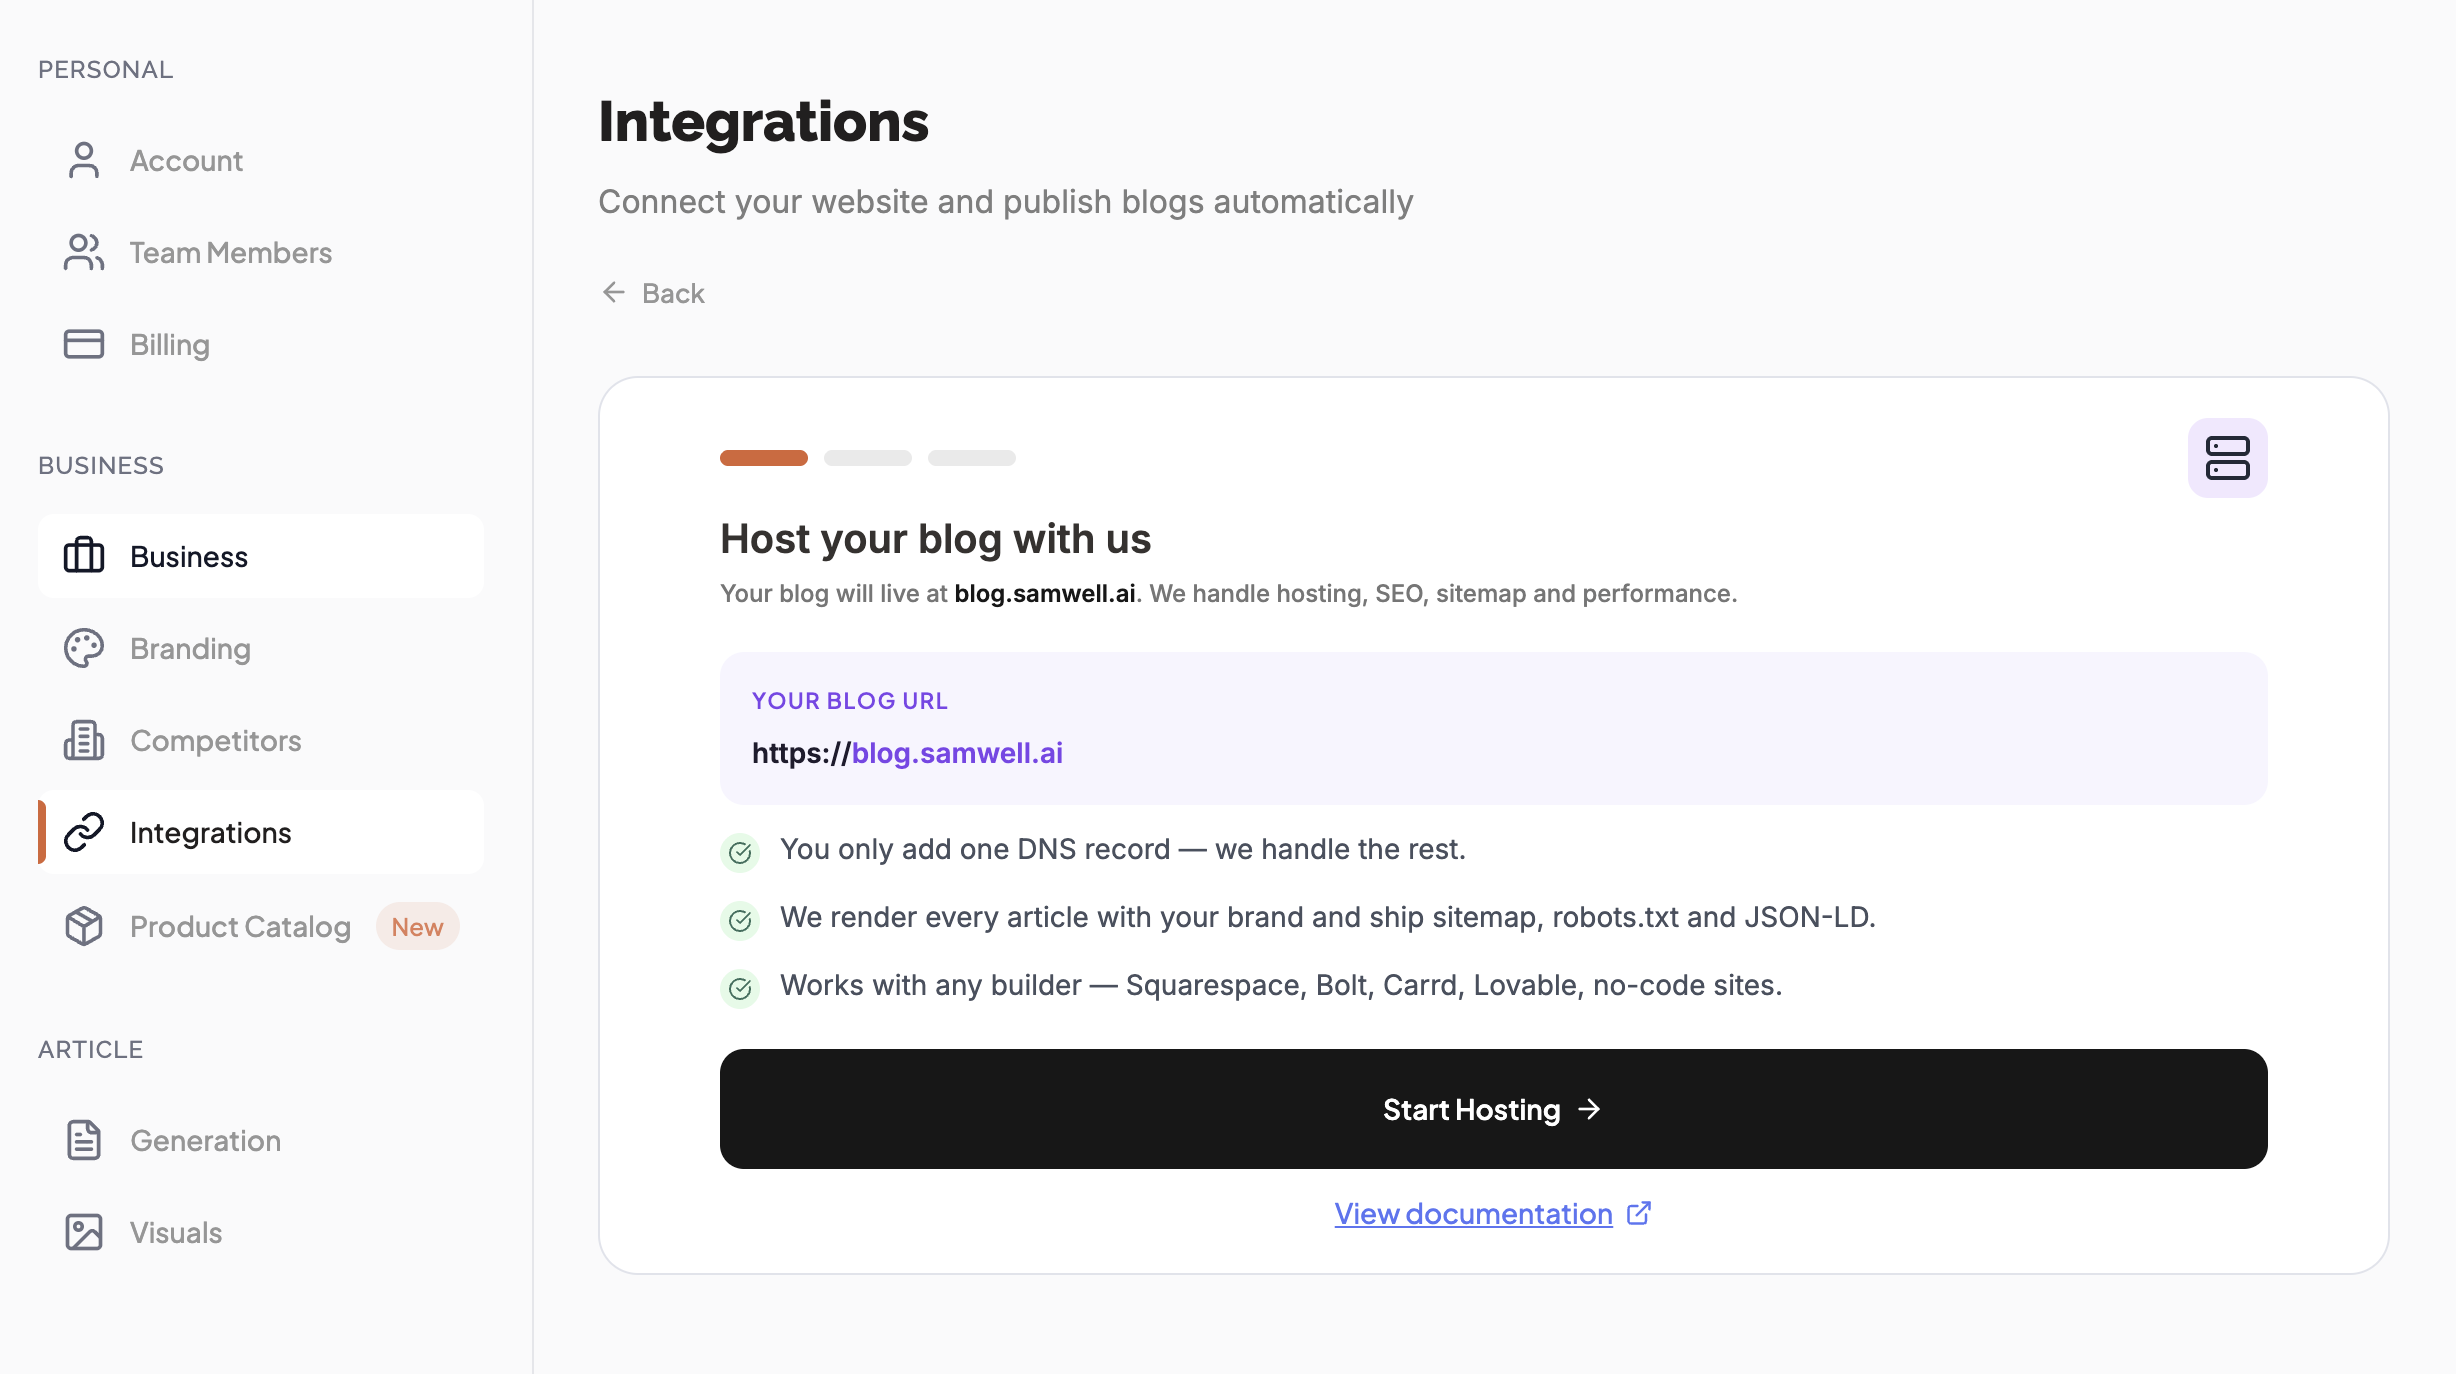
Step 1: Host your blog with usv
The wizard shows where your blog will live — blog.yoursite.com. We handle
hosting, SEO, sitemap, and performance. Review the preview and click
Start hosting.
- You only add one DNS record — we handle the rest
- We render every article with your brand and ship sitemap, robots.txt, and JSON-LD
- Works with any builder — Squarespace, Bolt, Carrd, Lovable, and other no-code sites
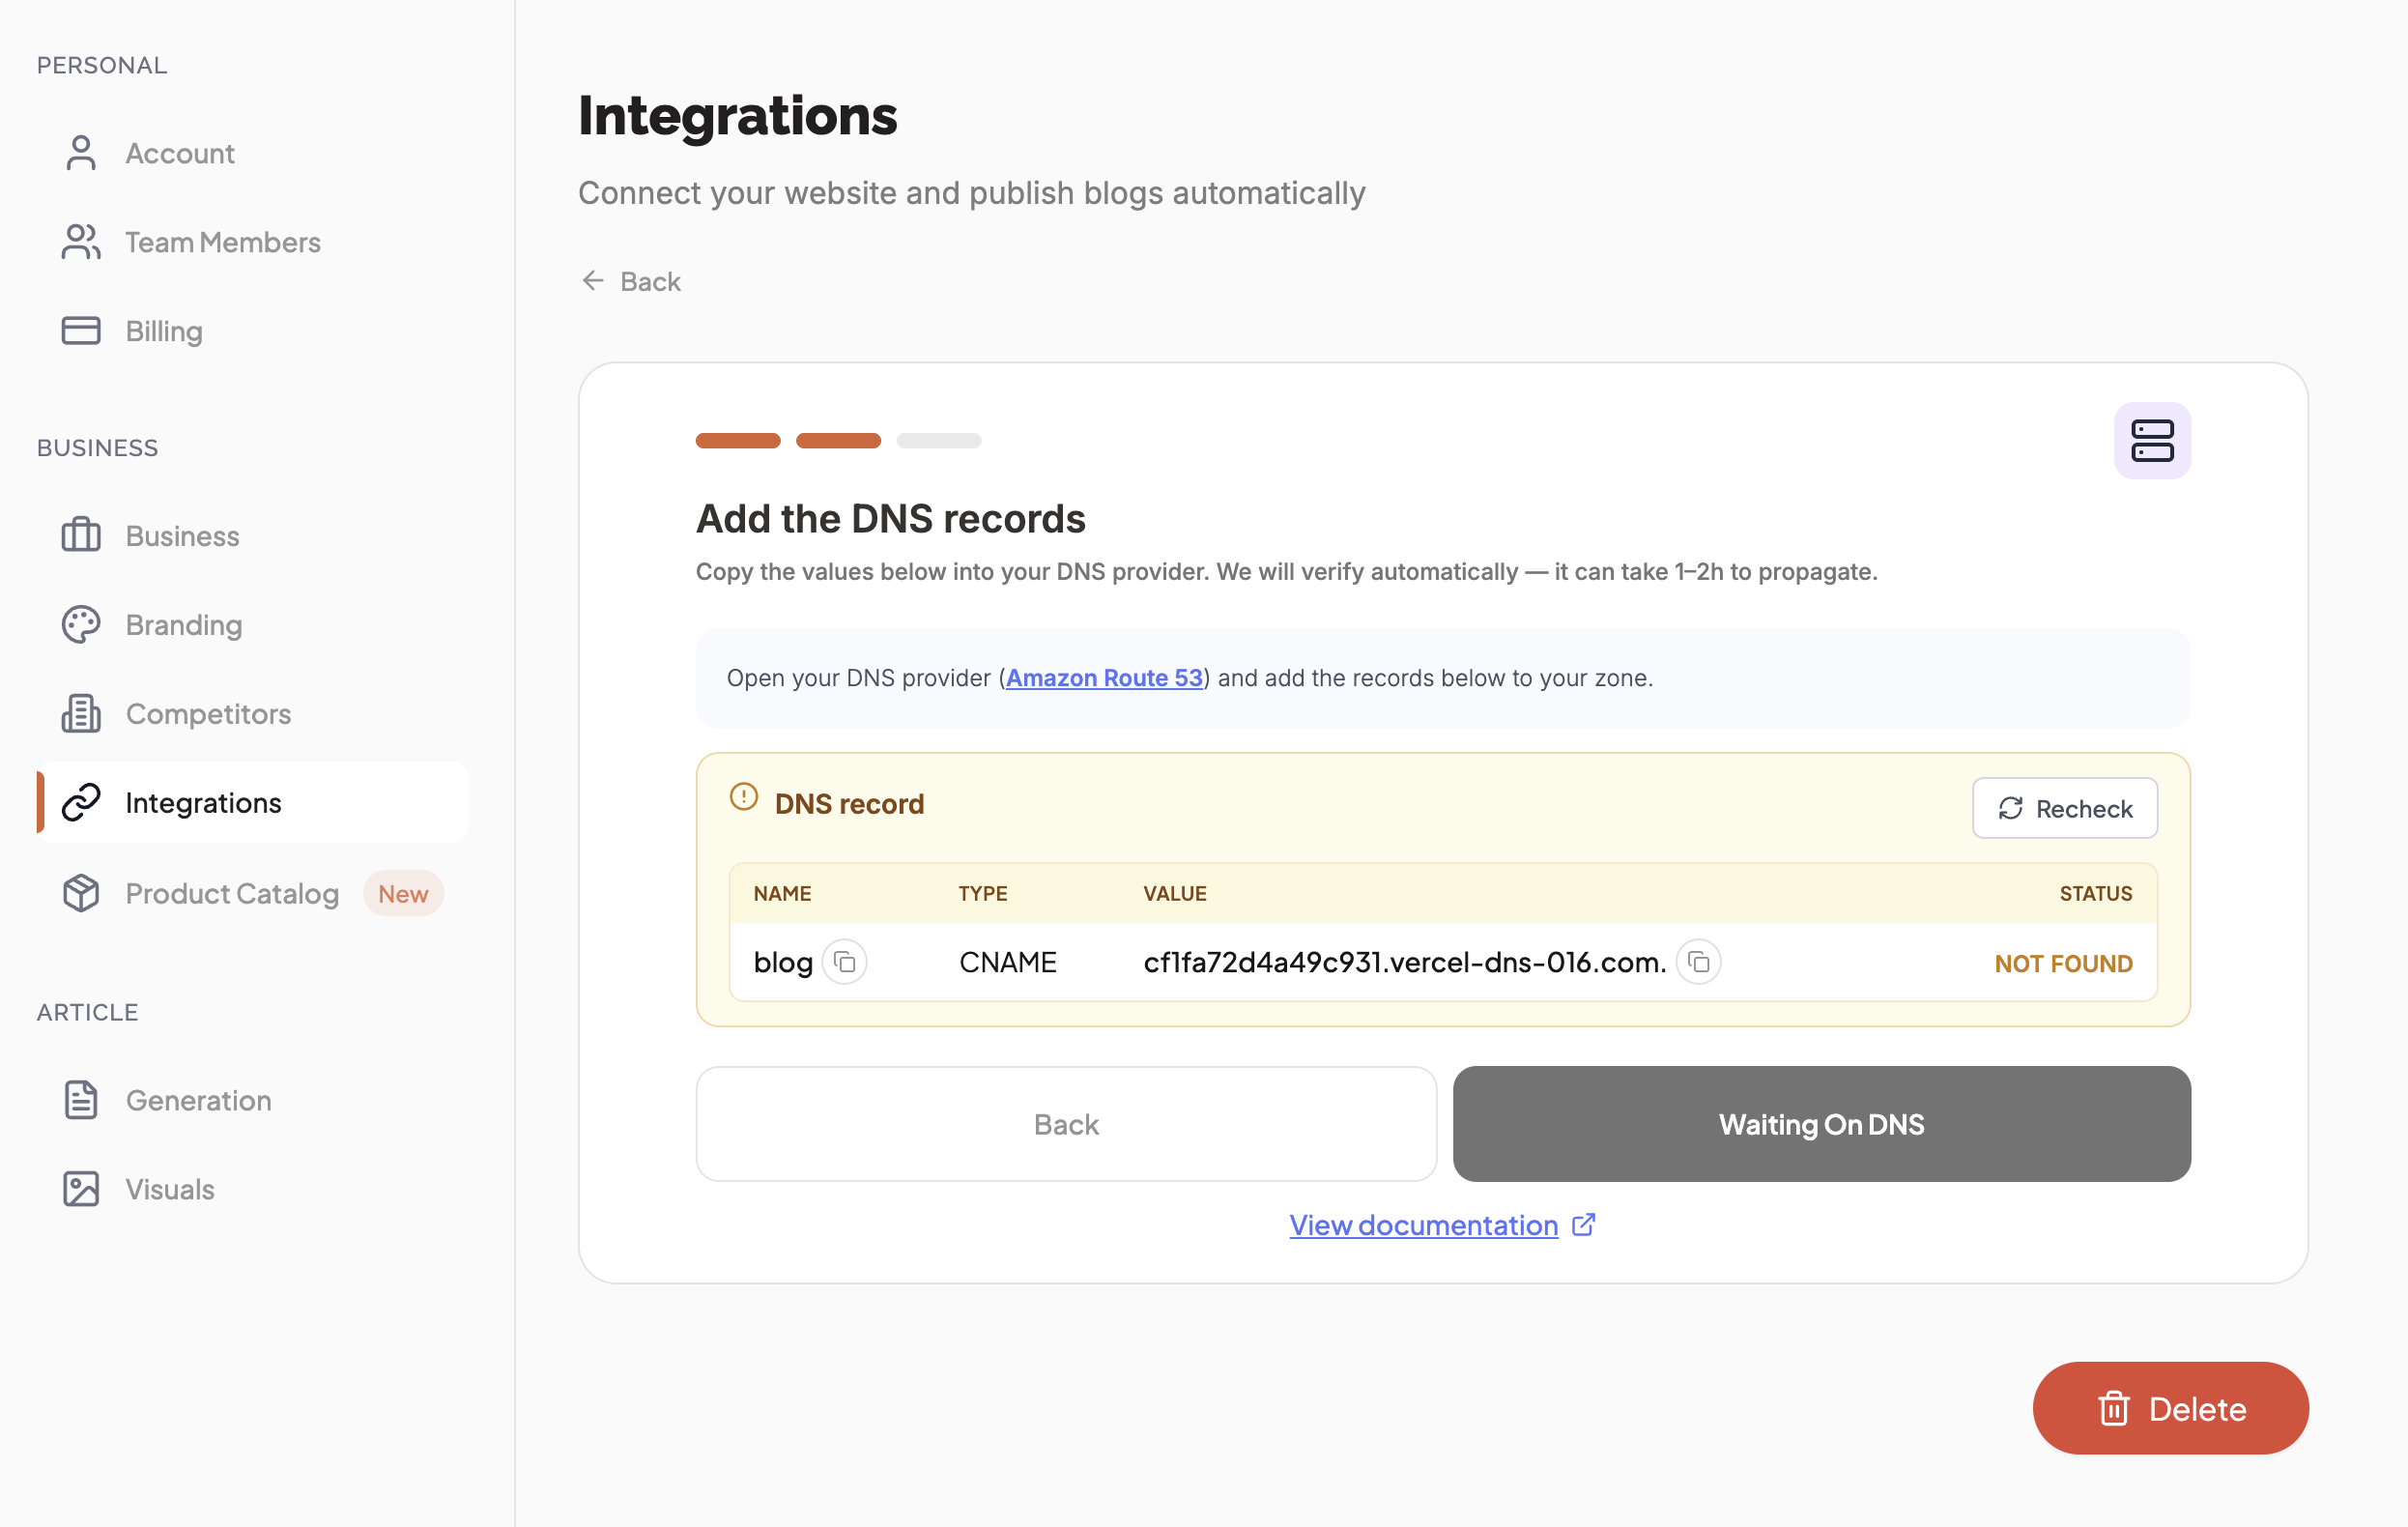
Step 2: Add the DNS recordv
Copy the values shown in the wizard into your DNS provider. We detect your provider and link you straight to its DNS page. You only need one record:
- Log in to your DNS provider (where your domain is managed)
Add the CNAME record exactly as shown:
Name/Host:
blog(or the subdomain shown in the wizard)- Type:
CNAME Value/Points to: copy from the wizard
- Save the record
DNS propagation: We verify automatically — it can take 1–2 hours to propagate. You can also click Recheck to verify the status.
Using Cloudflare? Disable the proxy for this record
If your domain runs through Cloudflare's proxy, it can block your blog from connecting. Fix it in 30 seconds:
Log in to
dash.cloudflare.com- Go to your domain → DNS → Records
- Find the CNAME record for your blog subdomain
Click the orange cloud icon so it turns grey (DNS only)
- Save — done.
Step 3: Brand your blog & go livev
Add a display name and logo — you can change these any time.
Once DNS is verified, your blog is live at blog.yoursite.com and new articles
publish automatically. Click View blog to open it.
Success! Your blog is now live and every new article will publish to it automatically.
Customization Options
Once DNS is configured and your blog is live, you can customize the appearance:
Brand Logo
- Upload a PNG, JPG, or WEBP image
- Recommended size: 200x200 pixels (square)
- Your logo will appear in the blog header
Brand Color
- Choose your primary brand color using the color picker
Enter a hex color code (e.g.,
#FA5C12)- Used for links, buttons, and accent elements
Troubleshooting & FAQ
DNS status shows "NOT FOUND" even after adding the recordv
DNS propagation can take anywhere from a few minutes to a couple of hours. To verify:
- Wait at least 15–30 minutes after adding the record
- Double-check the CNAME record (name and value) matches the wizard exactly
Make sure the record type is
CNAMEand notAorTXT- If you use Cloudflare, confirm the proxy is off (grey cloud) for the blog subdomain
Click the Recheck button in the wizard
Can I use a different subdomain instead of "blog"?v
The hosted blog is set up on blog.yourwebsite.com by default. If you need a
different subdomain, use the I need help button in the wizard to contact
support.
Where can I find my DNS provider?v
Your DNS provider is typically where you purchased your domain (like GoDaddy, Namecheap, or Cloudflare). If you're not sure:
Check the nameservers for your domain using a
DNS lookup tool
- Look for emails from your domain registrar
- Contact your IT team or web developer
BabyLoveGrowth automatically detects your DNS provider when you add the record and shows a direct link to its DNS management page.
Do I need to have an existing website to use blog hosting?v
Yes, you need a registered domain name. The hosted blog is available at a subdomain of your
main website (e.g., blog.yoursite.com).
If you don't have a domain yet, you can purchase one from providers like
Namecheap
,
GoDaddy
, or
Cloudflare
.
Can I customize the blog design beyond logo and colors?v
The hosted blog uses a clean, professional design optimized for SEO and readability. You can currently customize:
- Brand logo
- Brand color (for links and accents)
If you need more control over design and functionality, consider one of our
CMS integrations
(like WordPress, Webflow, or Shopify) instead.
Is SSL/HTTPS included?v
Yes! SSL certificates are automatically provisioned and renewed for your hosted blog. Your blog is always served over HTTPS for security and SEO benefits.
What happens to my blog if I cancel my subscription?v
Your blog remains online even after cancellation. All your published articles
stay accessible at blog.yourwebsite.com, preserving your backlinks and SEO value.
Additionally:
- Your articles remain saved in BabyLoveGrowth
- You can export your articles via the API
- You can reconnect or switch to a different integration anytime
How do I update my brand logo or color?v
Go back to Settings → Integrations, open Blog Hosting, and you can:
- Click your existing logo to upload a new one
- Click the color preview to pick a new brand color
- Changes take effect immediately
Does the hosted blog use server side rendering (SSR)?v
Yes! All pages on your hosted blog are fully server side rendered. This means:
Search engines receive fully rendered HTML, maximizing crawlability and indexing speed
- Pages load fast for every visitor, even on slow connections
- Social sharing previews (Open Graph, Twitter Cards) work out of the box
- No JavaScript is required for search engines to read your content
SSR is one of the key reasons the BabyLoveGrowth hosted blog delivers strong SEO performance without any configuration on your end.
Need Help?
If you run into any issues or have questions:
- Click the "I need help" button in the Blog Hosting wizard
- Contact support via the chat icon in the bottom-right of any page
- Email us at support@babylovegrowth.ai
Our team is here to help you get your blog up and running quickly!